Monday, October 31, 2011

NO RABBIT FOOD! STRAWBERRY FIELDS CHICKEN SALAD


I love to eat an abundance of fruits and vegetables, but I AM NOT A RABBIT and therefore I enforce a NO RABBIT FOOD POLICY! 

You know exactly what I am talking about... Iceberg lettuce, tasteless tomatoes and carrot sticks! What a hideous excuse for a meal! You know what they say... You don't make friends with salad! And I am pretty sure that statement was aimed directly at that particular boring and lifeless combination! 

Food is supposed to put a smile on your face, replenish your bodies energy and fill that forever growing void in your tummy. Eating is meant to be a fun experience, which means filling up on foods that surprise your taste buds and satisfy you without the guilt of over indulging.


That is why I am going to make you a promise that I aim to keep for life! I promise that all of my salad recipes I pass down to you will be full of fresh and vibrant flavors, and tickle your taste buds until they are all giggled outFirst off the bat is my:

STRAWBERRY FIELDS CHICKEN SALAD

INGREDIENTS
3          Chicken Breasts
2          Large Cucumbers, peeled
1          Medium Red Onion, finely 
            sliced
2 cups   Strawberries, cut in half or    
            quarters
1/2 cup Almonds, roughly chopped 
            lengthways
           S + P


DRESSING
1/3 cup Honey
1/2 cup Lime or Lemon Juice
1/2 cup Fresh Mint Leaves, finely chopped
1 TBS    Fresh Thyme Leaves, finely 
            chopped
1/4 tsp  Cayenne Pepper
1 TBS    Sea Salt
1 TBS    EVOO


1 ~ Boil 3 cups of water together with approximately 1 tsp each black pepper and salt. Once boiling place whole chicken breasts in the water to poach for approximately 13-15 minutes. Once the chicken is cooked all the way through, take out of water and leave aside to cool.
2 ~ In a large bowl mix together ingredients for the dressing. Whisk to combine.
3 ~ Cut cucumbers in half lengthways, and use a vegetable peeler to slice cucumbers into long ribbons. Once the peeler reaches the seeds, turn and repeat on the next side until all of the cucumber is sliced into ribbons. 
4 ~ Place cucumbers along with strawberries, almonds and red onion in the bowl along with the dressing.
5 ~ Take the cooled chicken breast and shred using two forks. Add chicken to the bowl and toss the salad ingredients together.


Enjoy!!!


This salad is full of protein and tasty low GI ingredients, that will satisfy your taste buds and keep you satisfied. 


Happy Cooking Foodies!


Wednesday, October 26, 2011

SUGAR CRAVING 101: CARAMELIZED PINEAPPLE with COCONUT CUSTARD and SALTED ALMOND COCONUT BRITTLE

All it takes is ONE


ONE thought provoking word to be mentioned... ONE picture to pop up on TV... ONE innocent idea from a friend... Which all lead me to ONE unbelievably whimsical moment in my mind, where I am living out my chubby kid dreams in my own version of candy-land. Mountains of decadent chocolate cake, lead to ice cream-falls (waterfalls made from ice cream) and various types candy coated baked goods! 


Once my transition into chubby mode begins, it is extremely hard to kick! I am all for indulging here and there, but when its 9 o'clock on a Wednesday night and your on the couch watching Seinfeld reruns, somehow it doesn't feel appropriate! 


SO why not embrace your inner chubbiness in a HEALTHY way!


Here is my RESCUE REMEDY for the persistent sugar craving. It is made from all natural ingredients, natural sugars, is very low in fat and will not disappoint! 


CARAMELIZED PINEAPPLE with COCONUT CUSTARD and SALTED ALMOND COCONUT BRITTLE! 
Serves 4-6
INGREDIENTS
1                Pineapple
                  Water
400 ml can  Coconut Milk
1/2 cup       Egg White
3 TBS          Malibu or Rum (optional)
15 drops      Stevia Extract *See note
1/2 tsp        Vanilla Extract
1/2 cup       Natural Almonds, halved lengthways (or slivered almonds)
1/3 cup       Shredded Coconut
2 TBS          Honey
1/4 tsp        Cayenne Pepper
1/2 tsp        Ground Sea Salt
                  Mint Leaves, to serve
METHOD
1 ~ Preheat oven to 325 degrees F (160 degrees C). Grease sheet pan with a little olive oil.
2 ~ In a bowl, toss together almonds, honey, salt and cayenne pepper. Spread almonds evenly over the sheet pan so they are in one layer. Sprinkle coconut over the top, and place in the over for 8-10 minutes or until the almonds and coconut are a little golden. 3 3 ~ Remove from the oven, toss to combine and place sheet pan in freezer to chill.
4 ~ Bring coconut milk, vanilla and rum to a simmer in a saucepan over medium heat. Once coconut milk is simmering, reduce the heat to very low.
5 ~ Whisk egg white and stevia (or honey if using honey) in a bowl. Take about 1/3 of the warm coconut milk and slowly whisk it into the egg white mixture. 
6 ~ Now take this egg white mixture and pour it back in to the saucepan over very low heat.
7 ~ Using a spatula, stir and scrape the bottom and sides of this mixture continuously until it begins to thicken. This should take approximately 5-7 minutes of continuous stirring. 
8 ~ Once it reaches a custard like consistency, pour it into a bowl and refrigerate.
9 ~ Slice the head and bottom off your pineapple and place the flat bottom on your chopping board. Slice the outer skin off, a little by little until the pineapple is clean. 
10 ~ Cut the pineapple in half lengthways, and half again. Cut out the centre core of each and cut lengths into 1/2 inch (1cm) thick pieces.
11 ~ Heat a large saute pan on high heat. Once pan is extremely hot (almost smoking), place the pineapple in the pan in one layer (no overlapping). 
12 ~ Cook for 2 minutes, reduce the heat to medium, drizzle a little water in the pan and flip pineapple. Cook for another couple of minutes, adding water whenever the pan becomes dry.
13 ~ Serve the pineapple dark side up on a plate, drizzle with the coconut custard and crumble the almond brittle over the top. Add a few baby mint leaves and enjoy!

* Stevia is my favorite alternative to artificial sweetener or sugar. Stevia is pure plant extract derived from the Stevia plant, and is approximately 15 times sweeter sugar. It is 100 % pure and contains no nasty harmful chemicals like artificial sweeteners do, and the best part is it is CALORIE FREE. It comes in liquid form or granulated, and you can use it in tea, coffee, desserts and it can replace sugar in many food items. I personally like the liquid form but if using the granulated form I would say 1-2 tsp should do the trick! 
** If Stevia is unavailable use 2 TBS of honey in its place.


HAPPY COOKING FOODIES!!! 

Sunday, October 23, 2011

Crispy Salmon with Asian Slaw and Miso Dressing

SALMON the SUPER FISH
Salmon is my favorite protein! Its beautiful, bright orange color screams "I'M AMAZING! YOU SHOULD EAT ME!" I love it poached, grilled, steamed, baked, raw, smoked and even pan fried. Salmon has a very unique flavor profile and tastes absolutely delicious with just a little sprinkle of salt and pepper. Not only is salmon a pleasure on your palate, but it really is a SUPER FISH! Just by eating salmon a couple of times a week, you will be loaded up on omega 3 and omega 6 fatty acids, as well as vitamin D and selenium which will help to: 
~Reduce the risk of cancer
~Reduce the risk of heart disease such as heart attack, stroke, heart arrhythmia and high blood pressure
~Increase brain function
~Reduce inflammation of joints and arthritis
~Promote healthy skin, hair and nails by locking in moisture and encouraging the production of collagen and elastin


In a nutshell SALMON will keep you looking and feeling young, you will be free of cancer, heart disease and you may even gain a few IQ points! So why not try my clean and tasty recipe for Crispy Salmon with Asian Slaw and Miso Dressing! The slaw is full of vibrant colors, and bright colored ingredients mean nutritious meals! My special miso dressing is the perfect accompaniment to this crunchy asian slaw and crispy salmon.


Crispy Salmon with Asian Slaw and Miso Dressing
Ingredients
4              Salmon Fillets, no skin
                S + P
1              Red Cabbage, finely shredded
1              Red onion, finely sliced
1              Bunch of Cilantro (Coriander), 
                 roughly chopped
1              Green apple, julienne
1/2 cup   Frozen corn, thawed
2              Carrots, julienne
1/2 cup   Peanuts
2 TBS      Black Sesame Seeds
                 A little extra cilantro for garnish
Dressing
1 TBS      Sesame Oil
1/4 cup    Miso Paste
2 TBS       Ginger, finely grated
2               Garlic cloves, finely minced
1 tsp         Sambal Oleic (asian chili paste)
1/3 cup    Rice wine vinegar
2 TBS       Honey
3 TBS       Lemon Juice
Method
1 ~ In a large bowl toss together the red cabbage, red onion, cilantro, corn, green apple, carrot, half of the peanuts and sesame seeds. 
2 ~ To make dressing place all ingredients in an empty jar. Shake for 1-2 minutes until smooth. 
3 ~ Pour dressing over slaw and toss to combine.
4 ~ To cook salmon, place a large saute pan on high heat. Season both sides of salmon with salt and pepper. Once pan is hot, place salmon in pan. Cook for 4 minutes on one side, then flip and reduce heat to medium low. Cook for another 4 minutes, flip once again so the side first side cooked is facing up and remove from pan.  *Salmon will be slightly pink in the middle. If you prefer your salmon rare, reduce cooking time to 3 minutes on each side.
5 ~ To serve place slaw in the middle of the plate, place salmon on top followed by a sprinkle of peanuts and cilantro. Enjoy!
Happy Cooking Foodies!!! 

Friday, October 21, 2011

Roasted and Spiced Baby Squash Soup, Topped with Crunchy Seeds and Crispy Prosciutto.


I have a dirty little secret to share with you all... I am ABSOLUTELY ADDICTED to SOUP! Soups are delicious, full of flavor, super nutritious and satisfy even the most persistent appetite.

I love my recipe for:

Roasted and Spiced Baby Squash Soup, Topped with Crunchy Seeds and Crispy Prosciutto.

I like to use baby squash as you can scoop out the flesh and use the shells as cute little serving bowls. Save the seeds and toast them with some spices, and you have a crunchy element to this creamy soup. A wholesome and nutritious way to make use of the entire squash with very little waste.

*Note that this is the fancy way of serving this super easy soup! Perfect to WOW guests on a special occasion or thanksgiving, but it is just at spectacular served in soup bowls.

Just peel 1 kg of your favorite squash, reserve the seeds and cut into 2 inch pieces, toss in a little EVOO, S + P and roast for 30 minutes. Roast whole sweet potato the same way as in the recipe (for 45 minutes or until tender).

INGREDIENTS
4 Round baby squash, washed (Approximately 400 g each)
1 whole Sweet potato,
2 TBS Olive Oil
1 large Onion, finely diced

2 large Garlic cloves, minced
2 TBS Fresh ginger, minced (approximately 1 inch cube)
2 tsp Ground cumin
1 tsp Ground coriander
1/8 tsp Ground cinnamon
1 tsp Curry powder
1 tsp Mustard seeds1 tsp Sea salt (Soup may need a little extra depending on your taste)
1/2 tsp Black peppercorns, ground1/2 tsp Dried red pepper flakes
3 cups Organic reduced-sodium chicken broth
1 cup Coconut milk

To Garnish
100 g Prosciutto
2 TBS Green onions or chives, finely chopped
2 TBS Coconut milk
Baby squash seeds (saved from inside squash)
Salt
1 tsp Cayenne Pepper
1 tsp Olive oil


METHOD
1 ~ Preheat oven to 400 degrees F (200 degrees C)
2 ~ Take a small slice of the base of each baby squash *If they have a fibrous stem
on top, remove the stem without cutting the flesh.
3 ~ Place the squash, bottoms down, on a sheet pan along with the whole sweet potato into the oven for 35 minutes.
4 ~ After 35 minutes the squash will be ready. Take it out of the oven and place the squash on a chopping board to cool.
5 ~ Return the sweet potato to the oven for an extra 10 minutes. *or until you can pierce a knife all the way through with ease.
6 ~ Place 3 slices of prosciutto on a sheet pan in the oven for 5 minutes then remove and cool.
7 ~ Once the sweet potato is cooked through, set on chopping board with the squash to cool.
8 ~ Reduce oven temperature to 300 degrees F (150 degrees C)
9 ~ In a large soup pot, saute onions in 1 TBS of olive oil over medium heat for 6-8 minutes *You want these to sweat and become translucent.
10 ~ Once onions are translucent, add garlic, ginger and mustard seeds.
11 ~ After 1 minute reduce the heat to low and add cumin, coriander, curry powder, red pepper flakes and cinnamon and saute for 1 minute and then turn off the heat.
12 ~ Once the squash are have cool to touch, turn them upside down so the cut side is up. Use a metal tablespoon to scoop out the flesh and seeds. Take as much of the flesh away from the shells without piercing the skin.
13 ~ Separate the flesh from the seeds and place in a large bowl. Place the seeds in a sieve.
14 ~ Rinse the sieve of seeds under a running tap to remove any flesh and debris, and then dry seeds with a paper towel.
15 ~ Place in a bowl with 1 tsp of olive oil, cayenne pepper and sea salt.
16 ~ Toss together and place on a sheet pan and place in the oven for 30-35 minutes.
17 ~ Peel the skin off the sweet potato and add it to the large bowl of squash.
18 ~ Add squash, sweet potato, chicken stock, coconut milk, black pepper and sea salt and bring to a boil.
19 ~ Once boiling, reduce to a simmer for 30 minutes, uncovered, stirring occasionally.
20 ~ Using a ladle, spoon soup into a blender to the half way mark. Blend in batches until all soup is smooth. (Be careful not to overfill when blending hot liquids)
21 ~ 5 minutes before serving rinse the squash shells in water and place back on the sheet pan in the oven to heat.
22 ~ To serve, ladle soup into shells. Drizzle with extra coconut milk, crumble the prosciutto over the centre and top with seeds and green onions.


HAPPY COOKING FOODIES!

Thursday, October 20, 2011

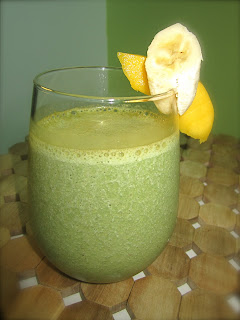
Take Life by the Horns and Charge with my LIFE MAKING, JUMP STARTING, GET UP and GRAB IT SMOOTHIE!

Life is all about being the BEST YOU, you can possibly be, and making the most out of each and everyday! Balancing a career, family, friendships, a relationship, and time for yourself can be difficult at the times, and waking up every morning ready to jump out of bed to start your day isn't alway easy (especially after a few too many wines the night before)!

Don't get me wrong I love coffee, but caffeine is purely a stimulant which will give you a kick, but will leave you needing yet another kick later on in the day! In reality, your body craves REAL FUEL in the form of ENERGY and NUTRIENTS to create daily inspiration from within, which will make for a productive, happy and balanced life. I believe happiness is from within, and for me that begins in my tummy! Feed your tummy the right things and your body will glow from head to toe!


So here is my:

LIFE MAKING, JUMP STARTING, GET UP and GRAB IT SMOOTHIE!

It will give you the physical energy and mind power to grab your day by the horns and charge through it like a PRO!!!Now don't let its color fool you! The nutrient rich Green Powder gives the smoothie a green color, but taste wise; you won't even know it is there!!!

Serves 1
1 Ripe banana-
(Peeled, chopped and frozen) *See note
1/2 Ripe mango-
(Peeled, chopped and frozen) *See note
1 cup Almond milk -
(Skim milk if almond milk is unavailable)
1 scoop Protein powder (I love banana or vanilla flavor)
1 scoop Greens powder **See note
1 tsp Flax seed *** See note
1/2 cup Low fat + low sugar, vanilla yoghurt
4-6 Ice Cubes

Whack it all in a blender for 2 minutes and you have yourself my LIFE MAKING, JUMP STARTING, GET UP and GRAB IT SMOOTHIE! Enjoy!

* I like to take a couple of ripe bananas and mangos at a time, peel and chop them and pop them in the freezer until I need them! This step is a must, as they are WAY BETTER frozen! Frozen banana and mango will make your smoothie so creamy you'll think it is full of ice cream!

**Greens powder is my little secret!!! It is AMAZING for energy boosting! It is a mix of various super greens, super foods and probiotics and is packed with nutrients!!!

***Flax seed is filled with omega fats which have endless health benefits!
~ Helps to prevent high cholesterol, heart disease, cancer and weight gain
~ Promotes healthy skin, nails and hair
~ Increases Metabolism and helps you lose weight

Wednesday, October 19, 2011

SUPER POWER COCONUT NUT BALLS


Protein Shakes and Protein Bars are great snacks when you are working out and getting fit, so why not try my quick and easy recipe to help you get your butt into shape!!!

SUPER POWER COCONUT NUT BALLS!


~ SUPER DELICIOUS
~ SUPER HIGH IN PROTEIN
~ SUPER ENERGY BOOST
~ SUPER POWER

WARNING: SUPER POWER COCONUT BALLS ARE SUPER ADDICTIVE!

Eat a couple of my bite size protein balls pre-workout and they will give you a super healthy boost of energy to pump those weights and nail that treadmill!

Replace your usual post-workout protein shake or protein bar with 2 of these 'Super Powered Balls' or as a snack on the go. They are all natural and will give you the protein you need to build and repair muscle, and keep your tummy grumbles away!

1/2 cup Almonds
1/4 cup Peanut Butter
1/2 cup Dates
1/2 tsp Cinnamon
1 TBS Honey
1/3 cup Dried fruit (cranberries, diced apricots, sultanas)
1/2 cup Shredded coconut
1/2 cup Rolled oats

1 ~ In a food processor, pulse almonds until they are chopped nicely.
2 ~ Add dates, peanut butter, cinnamon and honey, and pulse until combined.
3 ~ Add coconut, rolled oats, dried fruit and pulse 3-4 times to combine.
4 ~ Take 1 teaspoon of mixture and squish together in the palm of your hand to
form a ball.
5 ~ Place on sheet pan and repeat until all the mixture is gone.
6 ~ Refrigerate for 30 minutes and enjoy!


Tip: I like to use dried cranberries as they give this mixture a tart bite, but chopped dried apricots, or raisins would work too!

Happy Cooking Foodies!

Tuesday, October 18, 2011

Steal the Show: MINTED PEA with PROSCIUTTO and FETA BRUSCHETTA


I love to have friends over for wine and nibbles, but I don't like being stuck in the kitchen preparing food while every one enjoys themselves. This little number will be the life of the party and for once, you will actually be there!

My friends love this dish, but it isn't just for parties! Most of the ingredients you will already have in the cupboard, so you really can throw it together anytime! Try it for breakfast, lunch, dinner, or even Sunday brunch and I promise you, you will soon be addicted!

MINTED PEA with PROSCIUTTO and FETA BRUSCHETTA

Ingredients
1 Whole grain baguette
1 1/2 C Frozen peas, thawed
1/2 Onion, finely diced
1 bunch Fresh mint leaves
1 Lemon, juiced
3 TBS Parmesan cheese,finely grated
1/4 cup EVOO
Ground black pepper
3 slices Prosciutto
2 TBS Frozen peas, thawed

Method
1 ~ Preheat oven to 400 degrees F (200 degrees C)
2 ~ Sweat onions in a saute pan with a little EVOO over medium low heat until translucent. This should take 6-8 minutes.
3 ~ add 1 1/2 cups peas. Cook until heated through.
4 ~ Slice baguette diagonally into 1 cm (1/2") slices. Place on sheet pan and toast in the oven for 5-6 minutes until golden and crunchy. Lay the prosciutto on a separate sheet pan and place in the oven for the same time, until the prosciutto is a little darker and crunchy.
5 ~ In a food processor add the hot peas and onion, lemon juice, black pepper and mint leaves (save a few for garnish).
6 ~ Puree for 4-5 minutes until almost completely smooth, stopping every so often to scrape down the sides. Add the parmesan cheese and continue blending.
7 ~ As the food processor is on, drizzle the EVOO into the spout slowly.
8 ~ Once the puree is smooth and creamy, take a spoonful of the mixture and place on top of the toasted slice of baguette. Top with a little crumble of feta, prosciutto, a couple of peas and mint torn mint leaves. Drizzle with a little extra EVOO and serve!

Delicious!

Tip: Taste the puree as you go along. Check for seasoning, mint, acid and texture. Depending on your taste you may like to add a little more lemon juice, mint, salt or pepper.

Happy Cooking Foodies!